|
|
Adding Controls in a Spreadsheet
From NeoWiki
(Difference between revisions)
| Revision as of 22:10, 20 April 2008 (edit) Lorinda (Talk | contribs) m (→Inserting a group box and option buttons - just a little polish) ← Previous diff |
Revision as of 11:54, 23 April 2008 (edit) (undo) Jgd (Talk | contribs) (→Inserting a drop-down menu - add note about List Box) Next diff → |
||
| Line 46: | Line 46: | ||
| *Close the {{window|Properties: Combo Box}} window. | *Close the {{window|Properties: Combo Box}} window. | ||
| *Click on the '''Design mode On/Off''' icon. | *Click on the '''Design mode On/Off''' icon. | ||
| - | *:You can now select an item in the drop-down menu and see the corresponding text in the linked cell. | + | *:You can now select an item in the drop-down menu and see the corresponding text in the linked cell.<br> |
| + | '''Note''': you can also insert a '''List Box''' and follow the same steps. | ||
| ===Inserting a check box=== | ===Inserting a check box=== | ||
Revision as of 11:54, 23 April 2008
Form controls can be inserted in a Calc document. They provide you with many opportunities to add custom or advanced features to your spreadsheets. For instance,
- You might add a text box which contains some information about your document.
- You might wish to assign values to cells by
- using a check box
- selecting an item in a drop-down menu
- checking an option (or radio) button.
- You might also wish to add a button which will run a macro.
This article explains how to insert these controls.
Contents |
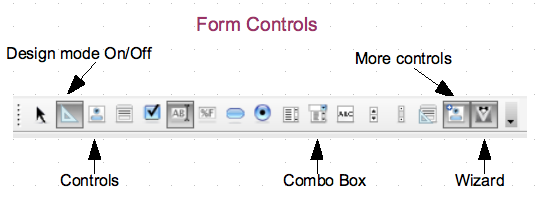
Displaying the Form Controls toolbar
To insert controls in a document, you need to display the Form Controls toolbar.
- Choose the View menu, then select Toolbars and Form Controls.
- Click on the Design mode On/Off icon. All the icons in the toolbar are now available.
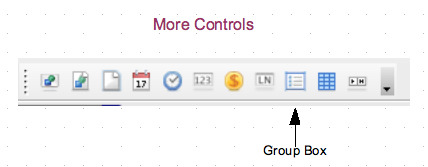
- When you click on More Controls, the More Controls toolbar opens, and you have access to additional controls.
Inserting a text box
- In the Form Controls toolbar, click on the Text Box icon (showing the letters AB with a cursor). Draw a rectangle with the appropriate size.
- Right click or Control-click, then select Control… in the context menu. (You can also select the Control icon, on the right side of the Design mode On/Off icon.)
- In the Properties: Text Box window, click on the General tab.
- Give your control a name. The name must not contain any spaces or punctuation marks.
- In the Default text enter the text you need to be displayed. If you wish this text to be read-only, select Yes in the Read-only drop-down menu, in the General tab of the Properties: Text Box window.
- Note : If you want to insert a paragraph break, you have to press Shift-Return.
- You can choose the font, the background color and the text type in the appropriate drop-down menus.
- Note: to be able to format the text afterwards, choose Multi-line with formatting in the Text type drop-down. If you wish to specify a Default text, you must do so before setting the Text type drop-down to Multi-line with formatting.
- Close the Properties: Text Box window.
- Click on the Design mode On/Off icon.
Inserting a drop-down menu
- In the Form Controls toolbar, click on the Combo Box icon.
- Be sure that the wizard is disabled (last icon in the toolbar, which looks like a butler's uniform).
- Draw a rectangle in the spreadsheet.
- Right click or Control-click, then select Control… in the drop-down menu. (You can also select the Control icon, on the right side of the Design mode On/Off icon.)
- In the Properties: Combo Box, click on the General tab.
- Give your control a name. The name must not contain any spaces or punctuation marks.
- In the List entries field, enter the list you need. Separate the items by pressing Shift-Return.
- Choose No in the Read-only drop-down menu.
- Choose Yes in theDropdown drop-down menu.
- If necessary, increase the number of lines in the Line count field.
- Click on the Data tab and choose the cell which will show the selected item.
- Close the Properties: Combo Box window.
- Click on the Design mode On/Off icon.
- You can now select an item in the drop-down menu and see the corresponding text in the linked cell.
- You can now select an item in the drop-down menu and see the corresponding text in the linked cell.
Note: you can also insert a List Box and follow the same steps.
Inserting a check box
- In the Form Controls toolbar, click on the Check Box icon.
- Draw a rectangle in the sheet. You will see Check Box displayed in the rectangle, but you probably will not see the check box because it's hidden by the anchor symbol.
- Right click or Control-click, then select Control… in the drop-down menu. You can also select the Control icon, on the right side of the Design mode On/Off icon.
- In the Properties : Check Box window, click on the General tab.
- Give your control a name. The name must not contain any spaces or punctuation marks.
- Give it a label: this is the text which appears near the check box.
- Click on the Data tab and choose the cell to be linked to this check box.
- Set the values you want in the Reference value (on) and Reference value (off). These values are the values assigned to the linked cell. Afterwards, you can use this cell as reference in formulas.
- Close the Properties : Check Box window.
- Click on the Design mode On/Off icon.
Inserting a group box and option buttons
Option (or Radio) buttons are used when you want to display a list of options which are mutually exclusive. To do that, you have to put those buttons together in a Group Box.
- In the Form Controls toolbar, click on the Wizards On/Off icon in order to activate the Wizard.
- In the same toolbar, click on the More controls icon.
- In the More controls window which appears, click on the Group Box icon.
- Draw a rectangle in the sheet. The Group Element Wizard : Data window opens.
- Fill the field Which name do you want to give the option fields? with the label of the first option button and click on >>. This label appears now in the Option fields area.
- Repeat this process for each option button.
- When it's done, click on Next>>.
- In the next window, you can choose to select an option button as a default.
- Click on Next>>.
- In the next window, choose the values you wish to assign to each button.
- Click on Next>>.
- In the window which appears, choose the caption to be given to the group box.
- Click on Finish.
- Now you have to link a cell to the buttons.
- Select the group box, and go to the Format menu.
- Choose Group then Enter Group.
- Select the first button and click on the Control icon in the Form Controls toolbar.
- In the Properties: Option Button window, click on the Data tab.
- In the next window, choose the Linked cell.
- Repeat this process with each button.
- Close the Properties: Option Button window.
- Choose the Format menu, then Group and Exit Group.
- Click on the Design mode On/Off icon.
- When you check a button, the assigned value appears now in the linked cell.
Inserting a button
- In the Form Controls toolbar, click on the Push Button icon. Draw a rectangle with the appropriate size.
- Right click or Control-click, then select Control… in the drop-down menu. You can also select the Control icon, on the right side of the Design mode On/Off icon.
- In the Properties: Button window that opens, click on the General tab.
- Specify the properties of the button. In the Label enter the button name.
- Click on the Events tab, then click on the … button beside the buton action that you want to run the macro.
- In the Assign Macro window, click on the Macro… button, then choose the macro you want to use.
- Click OK.
Note Thanks to for having provided helpful info on trinity forum. See [1] and [2]
This article in other languages: Français


